Why the Camera Changes How You Come Across — and What to Do About It
Recording a video triggers a specific kind of self-consciousness that live conversation doesn't. When you're talking to a person, your brain is mostly focused outward — reading their reactions, adjusting your words in real time, responding to their body language. When you're talking to a camera, there's no feedback loop. You're performing into a void, and your brain knows it. The result is over-monitoring: you become acutely aware of your hands, your voice, your face, the silence between sentences.
The self-monitoring problem
Over-monitoring is what makes people look robotic on camera. They're not thinking about their message — they're thinking about whether they look like they're thinking about their message. The fix isn't to "relax" (unhelpful advice) or to pretend the camera isn't there (impossible). It's to reduce the cognitive load enough that your brain can focus outward again. A teleprompter does this for your script. A rehearsed setup does this for your environment. Practiced delivery habits do this for your body.
What viewers actually notice
Viewers forgive a lot — slightly imperfect lighting, minor stumbles, a background that isn't studio-perfect. What they don't forgive is a presenter who doesn't seem to believe what they're saying, or who looks like they'd rather be anywhere else. The signals that create that impression are specific: downcast eyes, a tight or hunched posture, rushed speech, and monotone delivery. Each of these has a concrete fix. None of them require expensive equipment.
The compound effect of small adjustments
On-camera presence isn't one thing — it's the sum of several small adjustments that compound. Your setup reduces visual noise. Your posture signals confidence. Your pacing lets viewers follow you. Your eye contact builds connection. Each element is learnable in isolation, and they reinforce each other. The professional on camera doesn't just have good body language — they've also removed the setup anxiety that would have disrupted it.
![[object Object]](/blog/images/airtable/section1-look-confident-camera-business-professionals-guide-on-camera.webp)
Camera Setup: How to Make Any Space Look Professional
Your physical setup is doing work before you say a word. A well-framed shot with good lighting tells the viewer they're watching someone who takes this seriously. A poorly lit, oddly framed video with background clutter tells them the opposite — regardless of the quality of the content. Getting the setup right takes less time than most people think.
Framing: where to position yourself in the shot
Position your eyes roughly one-third down from the top of the frame — not at the center, and not so high that there's barely any headroom. The camera should be at eye level or very slightly above. Below eye level is the most common setup mistake: it creates an unflattering upward angle and subtly conveys casualness rather than authority. If you're using a phone or laptop, raise it with a stand, a stack of books, or a dedicated mount until the lens meets your eye line.
Lighting: the fastest upgrade you can make
Face your light source. Natural light from a window in front of you produces soft, even illumination that requires no equipment. If you're recording in the evening or in a room with poor natural light, a ring light positioned directly behind your camera is the next best option. The single rule: never have a bright light source behind you. It turns you into a silhouette and makes the camera compensate by washing out your face.
Background and audio
Your background communicates something whether you design it or not. A clean wall, a simple bookshelf, or a plant signals intention. A pile of laundry or a cluttered desk signals the opposite. If your physical space doesn't cooperate, a solid backdrop or virtual background swap keeps the focus on you. For audio, a clip-on lavalier mic costs under $30 and eliminates the hollow, echoey quality of built-in phone or laptop audio. Viewers will tolerate imperfect video far longer than they'll tolerate poor audio.
![[object Object]](/blog/images/airtable/section2-look-confident-camera-business-professionals-guide-on-camera.webp)
On-Camera Delivery: Eye Contact, Pacing, and Body Language
Setup gets you halfway there. How you show up inside that setup is the other half. Delivery is what builds trust — or breaks it — and it comes down to three things: where your eyes are, how your body is positioned, and how fast (or slow) you speak.
Eye contact: look at the lens, not the screen
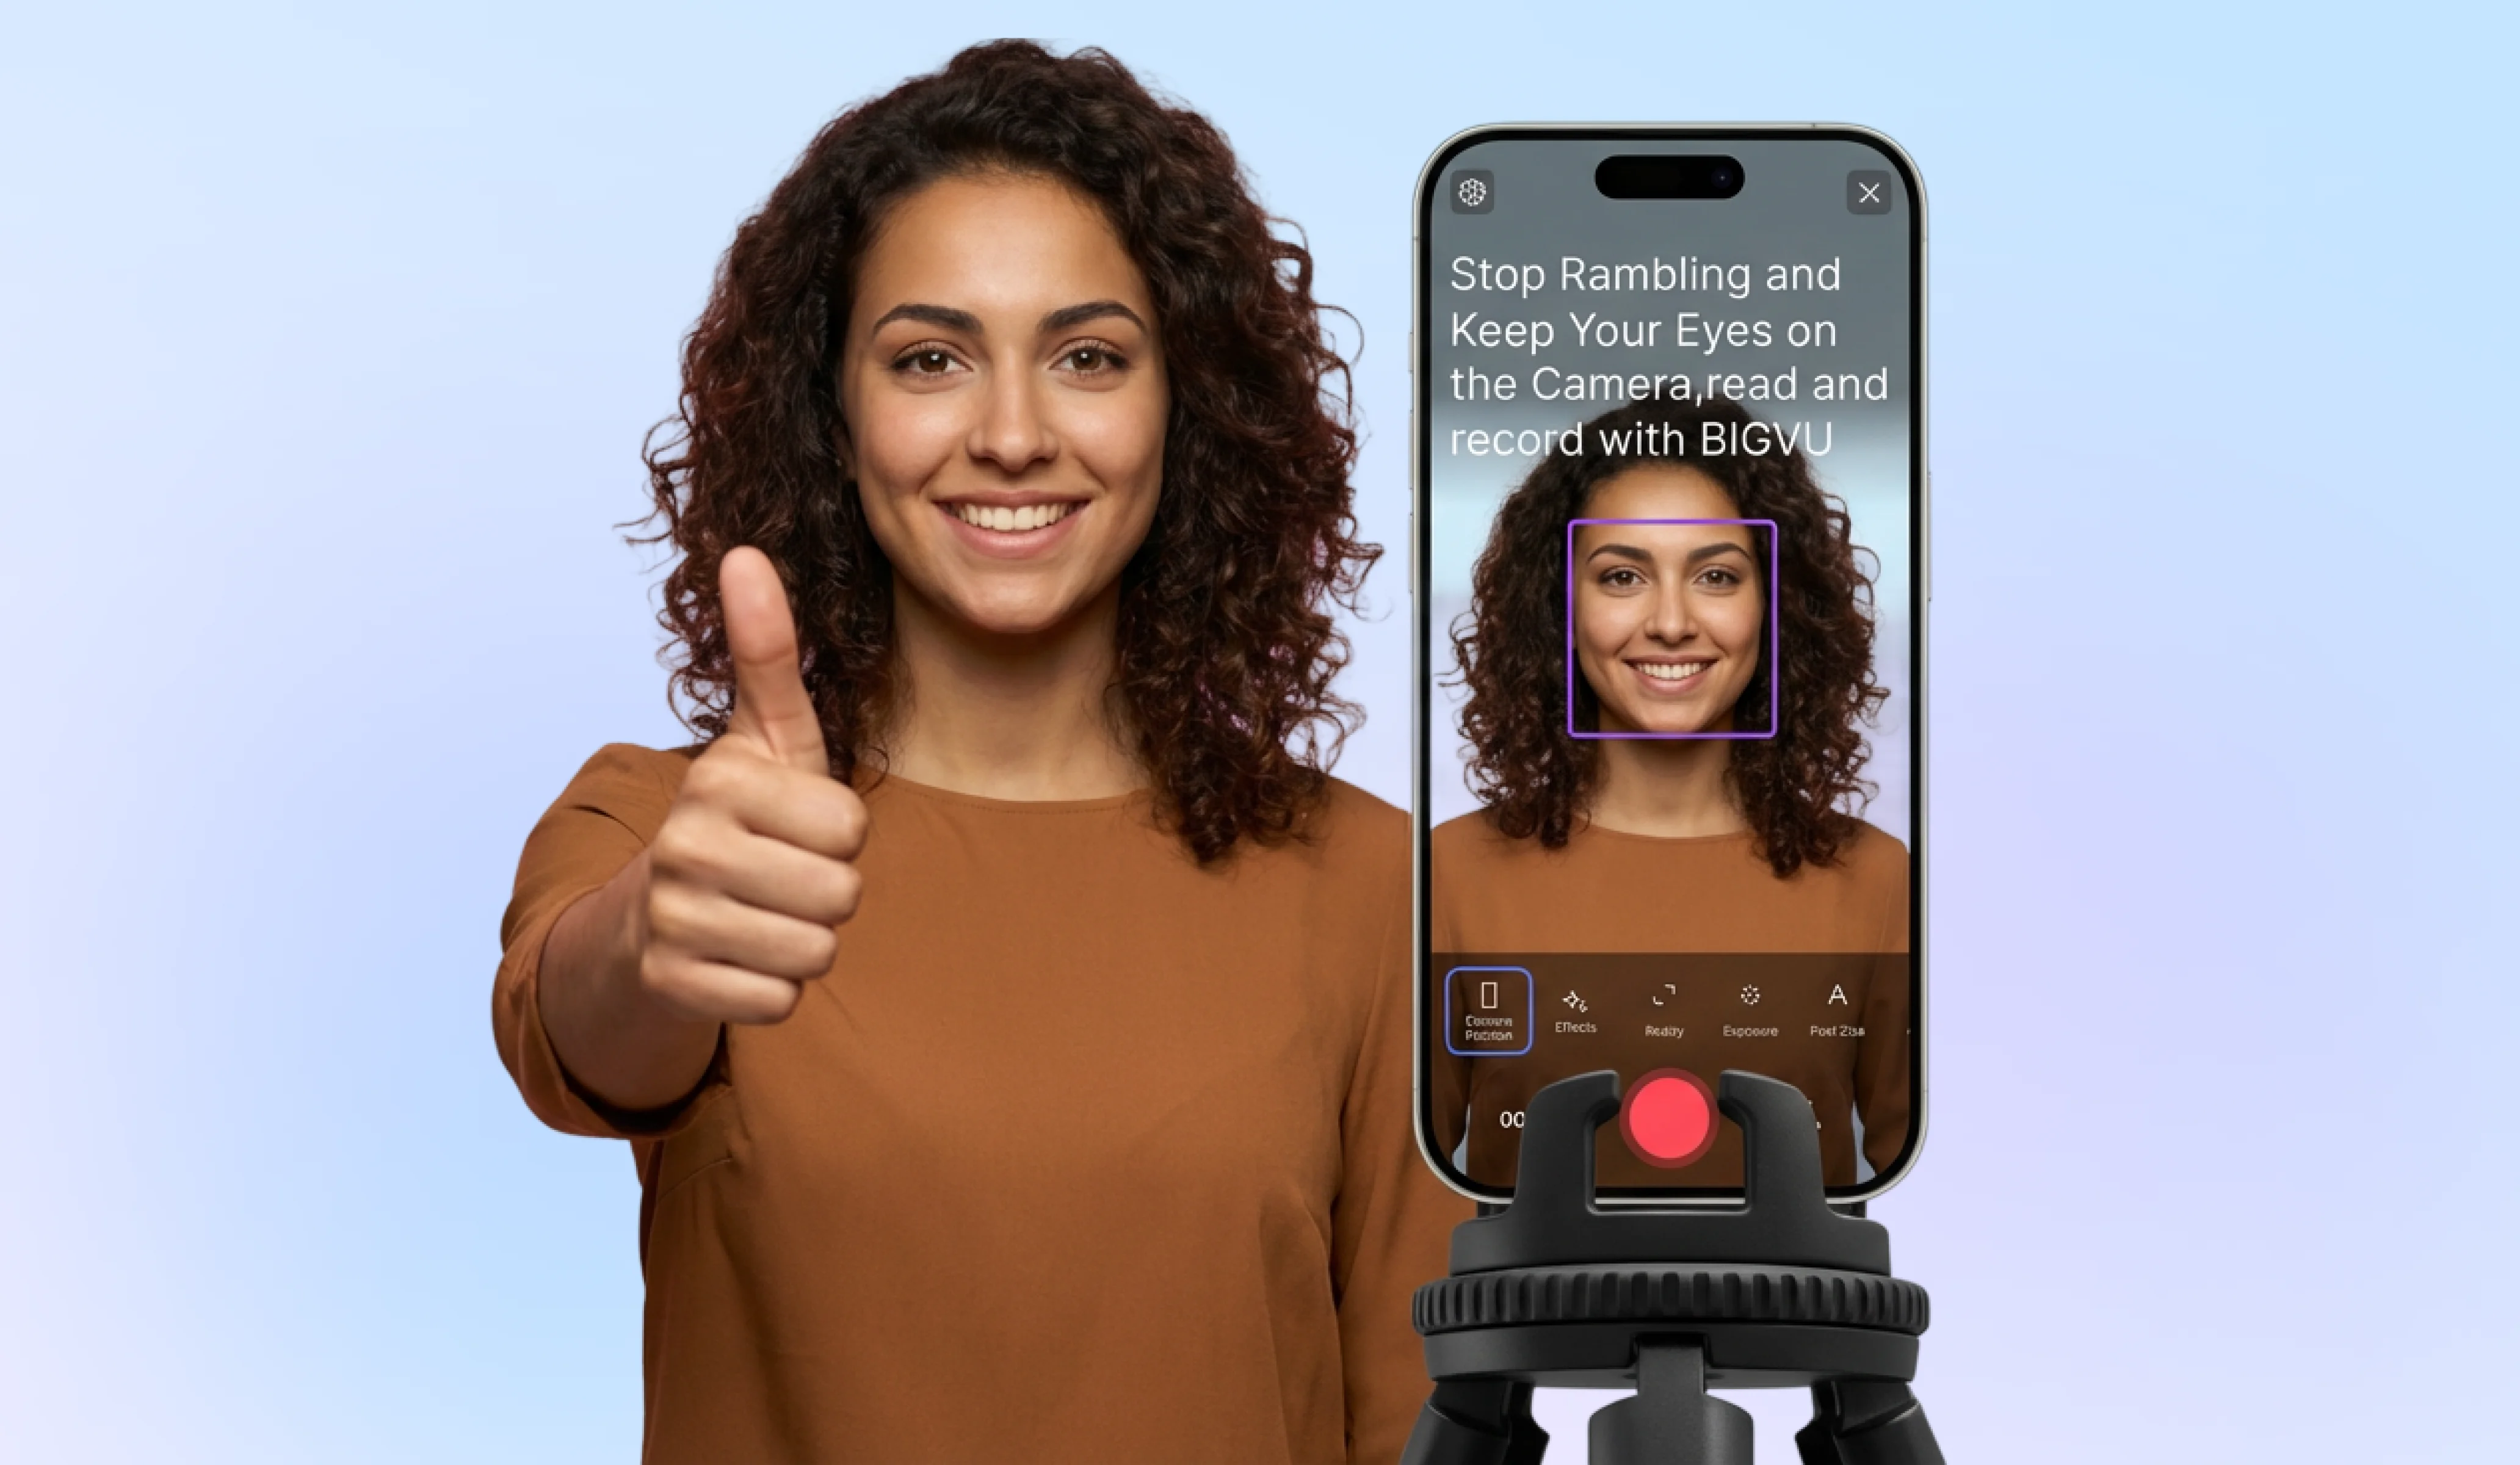
The most common on-camera mistake is looking at your own image on screen rather than at the camera lens. When you look at the screen, you appear to be looking slightly off to the side — which viewers read as evasiveness or uncertainty, even though you're looking at yourself. The lens is the viewer's eyes. Train yourself to look at it. If you're using a teleprompter, position the text as close to the lens as possible so that reading still produces near-direct eye contact. BIGVU's AI Eye Contact feature corrects any remaining gaze drift in post-processing, so the final video shows direct eye contact even when reading from a script.
Posture and hands
Sit or stand with your shoulders back and your chest open. This isn't a military stance — it's simply the difference between looking present and looking like you want to be done. Keep your hands visible in the frame and let them move naturally when you're making a point. Hands locked together or hidden below the desk make you look smaller and more guarded than you actually are. Natural hand movement adds energy and makes your reasoning easier to follow.
Pacing: slower than you think
Most people speak faster on camera than they do in conversation, because the absence of live feedback creates a subtle pressure to fill silence quickly. Slow down. Pause between sentences. Let a key point land before moving to the next one. Silence on camera reads as confidence, not hesitation. Rushing reads as nervousness even when you're not nervous. Aim for a delivery pace that feels slightly slow to you — it will sound natural to the viewer.
![[object Object]](/blog/images/airtable/section3-look-confident-camera-business-professionals-guide-on-camera.webp)
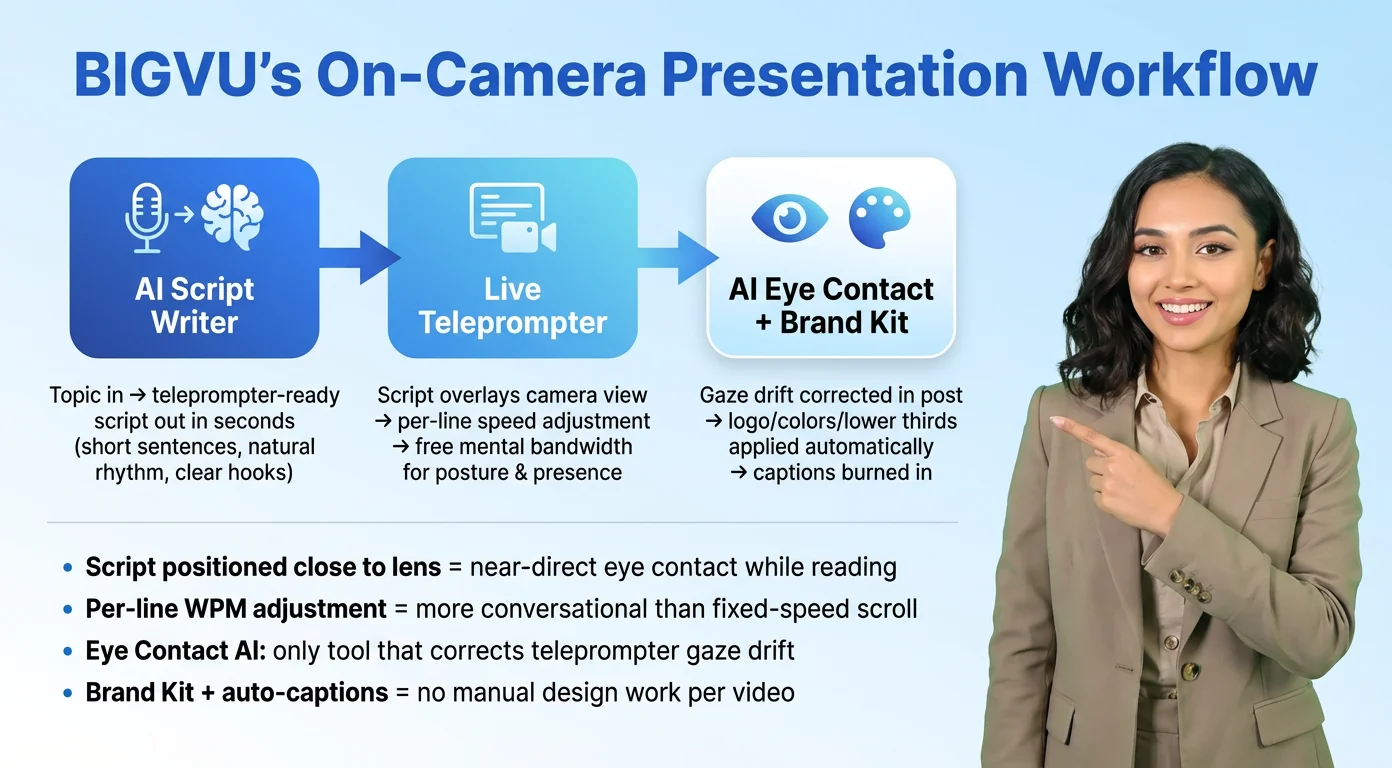
BIGVU’s On-Camera Presentation Workflow: From Blank Script to Finished Video
The two biggest sources of on-camera anxiety are not knowing what to say next and not knowing how you look saying it. BIGVU's presentation workflow addresses both directly, which is why the delivery habits covered above become much easier to execute when you're using it.
AI Script Writer: eliminate blank-page paralysis before you record
Most people spend more time trying to figure out what to say than actually recording. BIGVU's AI Script Writer takes your topic — a product explainer, a team update, a client introduction, a training module, a social media post-to-camera — and produces a ready-to-load teleprompter script in seconds. The scripts are written for delivery: short sentences, natural rhythm, clear hooks. You can edit before recording, but most of the time the structure is already there. Load it directly into the teleprompter and start.
Live teleprompter: read your script while maintaining camera presence
The teleprompter overlays your script directly on the camera view inside BIGVU. You read while the camera records your face. The text is positioned close to the lens so that reading produces near-direct eye contact. Scroll speed is adjustable in words per minute, and BIGVU's per-line speed adjustment automatically slows down for longer sentences and speeds up for shorter ones — which produces a more conversational rhythm than a fixed-speed scroll. With your script handled, your brain is free to focus on posture, pacing, and presence.
AI Eye Contact and Brand Kit: handle polish in post
After recording, BIGVU's Eye Contact AI corrects any gaze drift created by reading the teleprompter. The result looks like you were making direct eye contact with the viewer throughout. The Brand Kit automatically applies your logo, brand colors, and lower thirds — so every video that leaves the app looks consistent with your professional identity without any manual design work. Auto-captions are burned directly into the video, making it watchable without sound on every platform where silent autoplay is the default.
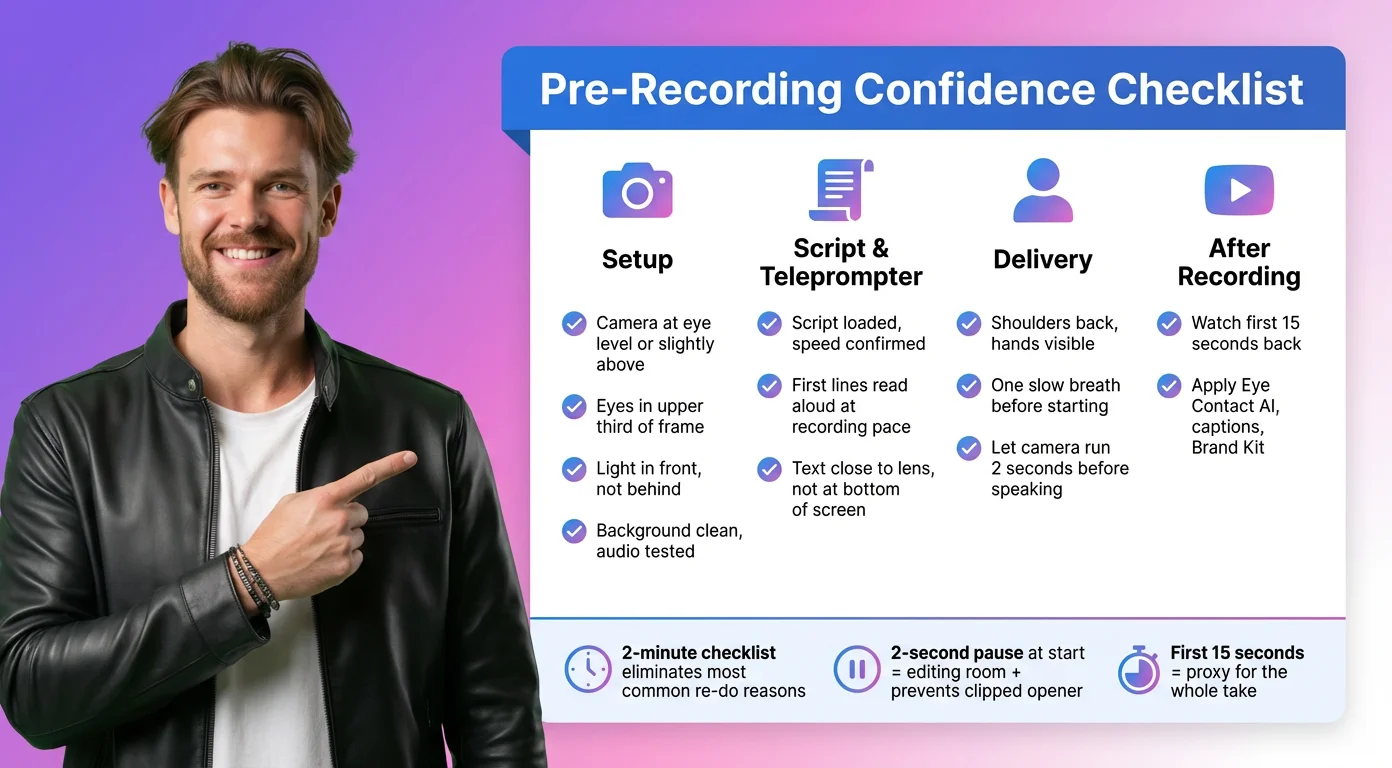
Pre-Recording Confidence Checklist: 10 Things to Verify Before You Hit Record
Running through this list before each recording session takes under two minutes and eliminates the most common reasons a take has to be re-done.
Setup
Camera at eye level or slightly above — not below. Eyes positioned in the upper third of the frame, not centered. Light source in front of you, not behind. Background is clean and intentional. Audio is tested — if using an external mic, confirm it's connected and recording.
Script and teleprompter
Script is loaded and scrolling speed is set before you hit record. Read the first few lines aloud at recording pace to confirm the speed feels right. The text is positioned close to the camera lens — not at the bottom of the screen where your eyes will visibly drop.
Delivery
Shoulders back and chest open before the first word. Hands visible in the frame. Take one slow breath before starting — this resets your pacing and prevents the rushed opening that happens when you start recording mid-tension. Start with a pause: let the camera run for two seconds before speaking. It gives you editing room at the front and prevents the clipped-opener that plagues most first takes.
After recording
Watch the first 15 seconds back before moving on. This catches the most common issues — framing, audio level, lighting, and your opening pace — without requiring a full review. If the first 15 seconds look and sound good, the rest usually does too. Apply BIGVU's Eye Contact AI, add captions, apply Brand Kit, and the video is done.